“Engineering is the art of directing the great sources of power in nature for the use and convenience of man.”
Thomas Tredgold
Have you ever thought of dedicating your life to something meaningful? Well, you have found the guide to it! Once you familiarize yourself with these notes on crafting, you will have learned enough to become a true artisan, a person who is instrumental in lifting your Civilization from the primitive ways of loincloths, caves and wooden clubs to the dizzying complexities of electrified cities, wireless communications and automatic firearms.
Here you will find the basics of how crafting works, along with the information on resource acquirement, tools, various workbenches, machinery and vehicles.
Be sure to consult the following pages:
Full Crafting List - contains the list of materials and detailed crafting recipes for most of the craftable items, save for those that require specific machinery or a workbench, such as anvil, bakelizer, gunsmithing bench etc.
Guide to Farming - includes the list of the agricultural produce, of which cotton, trees, and hemp are of particular importance for crafting.
Guide to Ranching - includes the list of animals, many of which provide various materials for crafting.
Guide to Construction - details on constructing walls, floors, doors etc.
Guide to Metallurgy - smelting raw metal ores, blacksmithing and metalworking.
Miscellaneous Crafting - details on crafting some more or less minor things with a specific manufacturing process.
Quick links:
This will bring up the crafting menu for a given material - a list of recipes for the items that can be made with this material at the present moment. Many recipes require a certain research level, otherwise they will not be available! Check the Full Crafting List for an item’s research requirements. If you belong to a faction, you can see the current research levels on the Character tab. If you are not a part of a faction, checking the current epoch on the Status tab will give you a general idea about the available recipes.
Some recipes also become obsolete over time and, consequently, are removed from the list in the later epochs.
While most items are made with just one material, some recipes require having a second material or a specific item in your non-active hand (for example, crafting a bone shovel needs bones and a wooden handle). In this case you will get a message if you are missing the required component.
Crafting anything increases your crafting skill which is displayed on the Character tab. Some recipes and workbenches require a certain level of the crafting skill, the former to craft an item and the latter to use them. For example, building a well or a wall requires the skill at the 1.1 mark, while using an anvil requires 1.7.
See this table for more info on skill requirements.
Different gamemodes may limit crafting options in some ways. For instance, in the Tribes mode, the research level for each race is locked, and the list of available recipes does not change, thus only Humans and Orcs can make and use the anvil.
Certain crafting options may also be restricted to certain professions. For example, in the RP maps like Colony and Pioneers, only the Blacksmith can use the anvil.
  |
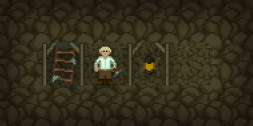
Stick | The humble beginnings of a future industrial superpower... First, harvest a branch by clicking a tree on Harm intent. Next, click the branch on Grab intent to remove the leaves, then click it again on Harm intent to clear the twigs. Voila! The first leap on the path of Progress has been made! Now the stick could be sharpened with a sharpened flint or a knife - click the stick with it. A sharpened stick could be used to catch fish (click fish tiles) or ants (click anthills); it could also be used to make a flint axe (see below.) |
  |
Flint | Could be found among rock piles on the ground - click rocks with an empty hand on Grab intent to look for flint. Next, click rocks with flint to sharpen it. |
 |
Flint hatchet | Made by attaching a sharpened flint to a sharpened stick. A forefather of more advanced hatchets. |
   |
Knife | Made with either 4 bone pieces or 1 unit of manifold materials: stone, copper, bronze, iron, steel, tin, even gold, silver and diamonds. Metal knives are made via casting in the knife mold. Used to cut trees, skin animals and stab enemies in a desperate situation. Used to cut wires and cut down curtains as well. The bone knife (the top one) is also a surgical tool in the earliest epochs, but for that refer to Surgery. And check the Guide to Cooking for more culinary uses of the knife. |
  |
Hatchet | Made with either 2 bone pieces, 2 stones or a cast axehead (copper, bronze, iron or steel), plus a wooden handle. Mainly used to cut down trees for wood or to remove bushes and even rocks on the ground, but sometimes applied against hostile wildlife or malevolent people. Can be used to break fences or walls as well. |
  |
Hammer | Made with 5 wood logs. Used to deconstruct floors, fences, beds, chairs, tables, braziers, wooden roof supports and many other things - click something with a hammer to see whether it could be deconstructed. Also used to fix and unfix custom signs, paintings and mirrors in place. A clawhammer (the bottom one) is made with 3 iron ingots and functions as a modern and quicker variant of the hammer. Also, do not be surprised if you see your local chef brandishing one. |
  |
Shovel | Made with either 2 bone pieces or a cast shovel head, plus a wooden handle. Used to dig up dirt, sand and snow, as well as for digging underground entrances (tunnels), irrigation channels, pit latrines and graves. For the last four, hold a shovel in the active hand and click it, or press Ctrl-Z or Z in the hotkeys mode, then choose a respective option. An underground entrance (more like exit, in this case) could also be dug upwards if done underground, unless there is some kind of obstacle on the surface, e.g. a floor cover. |
  |
Chisel | Made with either 8 stones or 8 iron ingots. Needs a hammer in the non-active hand to use. Used to give a certain design to a stone wall or an underground rock wall (take notice, that you could still mine through the latter despite it looking like a stone wall). To use, click a stone wall with a chisel. |
 |
Wrench | Made with 5 iron ingots. Used to secure and unsecure movable objects, such as tables, glazed windows, braziers, ovens, furnaces, pianos, catapults and others. |
  |
Pickaxe | Made with either 2 bone pieces, 2 stones or a cast pickaxe head, plus a wooden handle. Used to mine underground rock walls. The iron pickaxe works quicker. |
 |
Jackhammer | Made with 24 steel sheets. Used for the same purpose as pickaxes. The fastest mining tool. |
 |
Ore collector | Made with 5 leather sheets. Used to pick up ore from the ground in a more efficient manner. Have the ore collector in your active hand, stand over the ore on the ground, then click the collector, or press Ctrl-Z or Z in the hotkeys mode. The ore will be put in the collector whose ingenious design allows to exceed the normal stacking limit (50 units per one stack) for its contents. |
 |
Engine maker | Made with 5 iron ingots. Used to construct engines, except for the steam engine. Have the engine maker in your active hand and a stack of steel sheets in the other hand, then click the engine maker, or press Ctrl-Z or Z in the hotkeys mode. Choose the engine to construct. |
As you look upon the sunny fields, bordered by a lush green forest, or upon the scorched desert dunes and steep snow-capped mountains, a warm feeling comes over you - you cannot help but wonder at the abundance of so many resources ripe for the taking, processing and exploiting. Ah, sweet industry!
If there are any recipes associated with a given material, the material name has a link - click it to see the recipes list in the Full Crafting List. If there is no such link, it means the material does not have a crafting menu of its own, but it is still used as a component in some other area of crafting.
There are two main ways to obtain Wood for crafting:
Cut down trees in the wilderness - preferably, a hatchet should be used, but a knife works too, although it will take around 15-20 hits to fell a tree. Depending on the tree, the yield is 3-7 wood logs. However, avoid using knives to cut down palms - it will take much more effort to cut the trunk of these desert-hardened trees. Trees will grow back slowly.
 |
Wood log | A visual representation of a wood log placed herein to avoid any ambiguities. This is a guide, after all. Wood is also used to produce lye. Put a stack of wood on the ground (make sure there is no grass on it, or it will start a fire). Click the wood with a lit torch or a flashlight on Harm intent. Scoop the ash (1 ash per 1 wood) with a vessel like a barrel, a bucket, or a cooking pot. Put the ash into a cooking pot and cook it on an oven or a campfire (like boiling water). Every 5u of ash will produce 1u of lye. |
 |
Wood Plank | A visual representation of a wooden plank. Planks are used for the majority of more complex wooden items and can be made from a primitive sawmill or made in bulk from more advanced sawmills. |
 |
Leaves | This is what you get when removing leaves from a branch. Used to make thatch roofing - click the leaves in your active hand, or press Ctrl-Z, or Z in the hotkeys mode. Can be used as fuel for campfires, ovens etc. Edible if you happen to be a gorilla. |
 |
Palm leaves | Obtained by felling palms. Used to make palm leaves roof. Edible for gorillas as well. |
Almost every living being out there could contribute to the cause of Progress. Let’s examine this more closely, leaving all the edible bits to the Guide to Cooking.
   |
Furs and Pelts | Obtained from various animals (check the Full Crafting List) by skinning the carcass with a knife on Grab intent. Pelts could be made into coats, gloves, footwear and headgear. Fur clothing comes in handy in the colder climates and seasons. Pelts could also be turned into leather on the tanning rack - cut the hair off of the hide with a knife, then place the hide on the rack and wait until it's ready. One extra leather sheet is obtained this way, compared to skinning the carcass directly for leather as described below. |
  |
Wool and Woolcloth | Obtained by shearing sheep with shears (made from either bronze or iron). Used for many varieties of clothing, mainly as a cloth substitute for the biomes that lack cotton. Use the loom to turn wool piles into Woolcloth. |
 |
Leather | Used for clothing, military equipment, various bags etc. Obtained from many animals by skinning on Harm intent. Larger animals provide more leather. |
 |
Bone | Obtained by skinning the animal carcass regardless of the intent. A material for primitive tools and weapons. |
 |
Animal fat | Obtained by butchering the carcass of certain animals on Harm intent. Fat is dropped by pigs, cows, bison, buffaloes, camels, wolves, bears and mammoths: the larger the animal, the more fat. Animal fat is used to produce lard, which, in turn, is used to produce fat oil. To make lard, take animal fat and click any vessel like barrels, buckets or cooking pots with it. 1 animal fat = 10u of lard. To make fat oil, put lard into a cooking pot (a copper one, for instance) and cook it on a campfire or an oven (like boiling water). Every 2u of lard will produce 1u of fat oil. Fat oil and lard are used in cooking and manufacturing. Fat oil can also be used as fuel for lanterns and the hot bulb engine. |
This group includes the kinds of soil that could be used as materials. First, you need a shovel - click the ground with it to dig. You may need to remove the grass with a plough first or shovel the snow away (on permafrost tiles the dirt could never be exposed). Farming fields could also be dug. There is a limit to how many times you could dig a single tile.
When you have piles of dirt or snow, you can use them right away to build barricades and walls. Refer to the Construction section for more details.
 |
Dirt | Used to produce Clay and to construct dirt walls and barricades. To produce clay, pour water from a container onto a dirt pile, 10 units of water per pile. |
 |
Sand | Used to produce Glass sheets via firing in the campfire and ovens. |
 |
Snow | Not exactly a type of soil, but could be used to construct walls and barricades, similarly to dirt. |
The riches that have been accumulating for eons, concealed by mass of rock. Time to hollow out the earth and put them to good use!
Metal ores must be processed before crafting, and smelting them is covered in the Guide to Metallurgy. See that section for the detailed description of smelting and available alloys. Smelting ores produces ingots, which are a material that could be used for crafting.
Obsidian is turned into usable material sheets by cutting it with hammer and chisel - click a stack of obsidian rocks with a chisel while holding a hammer in the other hand.
Diamonds are simply… cooked until ready in the campfire and ovens (for now).
| Metals | ||||||||
  |
  |
  |
  |
  |
  |
 |
 |
 |
| Copper | Tin | Iron | Lead | Gold | Silver | Mercury | Platinum | Uranium |
| Others | |||||||
 |
 |
 |
 |
 |
 |
  |
  |
| Stone | Sandstone* | Marble | Mineral coal | Saltpeter | Sulphur | Diamonds | Obsidian* |
Additional information
Uranium is radioactive! It will slowly irradiate everything in the vicinity if left out in the open.
The ore yielded from excavation is random, but there is a different chance for each ore depending on the epoch and biome. Some ores are noticeably rarer than others. Among the rarest ores are diamonds, coal, saltpeter, sulfur and uranium. Lead, mercury and platinum are also somewhat uncommon.
Marble can be turned into Stone: 2 marble > 1 stone (use “reclaim stone” in the marble crafting menu).
Ores marked with (*) could be found only in the undergrounds of certain biomes:
Sandstone - Desert.
Obsidian - Jungle (obsidian is also available from 313 BC to 1713).
Safety first! |
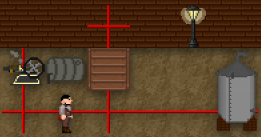
Mining is pretty straightforward, save for one nuance:
|
Now about that nuance, which has to do with how supports work. Stay within two tiles of a nearest mining support to avoid a cave-in! Look at the picture - the lantern on the ground marks the maximum safe distance at which you can stand and mine everything in your reach. Even though supports technically hold 3 tiles of the ceiling, if you stand on a tile and there are 2 tiles between you and the closest support, a cave-in is likely to happen. Back to the picture - if you so much as stood on the rightmost tile, where there is no support, it could result in a cave-in (it is not guaranteed to happen, but the probability is high.)
There are two kinds of cave-ins, a minor and a major one, and there is an element of chance as to which cave-in befalls a careless miner. A minor cave-in is more likely to happen at first - a few rocks would fall and leave you with a couple of bruises or a bleeding at worst. But the more you stay at or try to enter the dangerous spot, the higher the risk of a major cave-in, which will literally bury you under the piles of rock, trapping you and possibly breaking some bones. And you better have either wood or stone at hand to make a support, otherwise you are stuck for good. You could scream, of course - someone just might hear you…
Finally, you do not always have to go underground to mine. The rock tiles suitable for mining could also be found on the surface, sometimes covering a large area (they are still named ‘underground rock’, though.) Be mindful, that, if you start mining and the ground under the excavated rock walls appears darkened compared to the outside, it means the darker area is considered a cave and you need to place supports there to prevent cave-ins, just like underground.
And do not forget the ore collector!
There is nothing like burning some dead, millons of years old microorganisms for your own comfort or processing them for shiny plastics, so let’s start drilling!
 |
Oil spring | A spot where an oil deposit reaches the surface of the earth, allowing the collection of crude oil with any containers that could hold liquids: buckets, barrels etc. Click the oil spring with a container, and you will fill it with 10 units of oil. The oil spring will refill presently. Before the advent of engines and machines, crude oil is mostly used as fuel for lamps and lanterns, or as a handy tool by scheming poisoners in royal courts. Yes, drinking oil is bad for health. Very bad. |
 |
Oil well | Now we are talking! With this wonderful contraption, the scope of the oil industry could become truly fascinating. Made with 40 wood logs, the oil well will automatically fill any container you put inside it (click the oil well with the container in hand to put it in, click the oil well to remove it.) Needs to be built over an oil spring. |
Additional information
Crude oil could be distilled and processed into a number of petroleum products. See the Machinery section for more information on the respective equipment. However, crude oil could be used directly to fuel one of the more primitive engines - the hot bulb engine.
Petroleum as fuel for lamps, lanterns and the hot bulb engine could be substituted with olive oil.
The means to harness fire.
To keep the flames burning, you need fuel, and for that you can use either wood, tree branches, mineral coal or charcoal.
 |
Charcoal | A byproduct of burning, it will appear at your campfires and ovens once in a while and could be used as fuel. |
Pay attention when adding fuel to your fires, so as not to accidentally feed it a whole stack of 50 pieces of coal (unless that is your intent, of course)! Fuel cannot be retrieved! Shift-Click the stack to examine the quantity, then separate the stack by holding it in the non-active hand, pressing Alt and clicking it with the active empty hand.
Here is how long 1 unit of different fuel will last (minutes):
Take something that you intend to put in the campfire, oven etc. (food item, ore, fuel.)
Click the campfire, oven etc. with it. Fuel is spent irretrievably, while everything else is put ‘inside’ or ‘in the fire’ and could be ejected by right-clicking a campfire or an oven and choosing ‘Empty’ command. The number of items that could fit inside is termed ‘capacity’ (see more in the next subsection.) One stack is considered a single item. Pots do not go inside, they are ‘physically’ put onto the campfire or the oven itself.
Click the campfire, oven etc. again to light the fire. You can also add more items to be cooked while there is fire.
After a while a product will be ready - cooked food, metal ingots, glass sheets etc. Unless, of course, it was something unsuitable, in which case it will turn into burned mess which you can only throw away.
Click the campfire, oven etc. to put out the fire, or leave it burning for light.
Essentially, these three have the same functions - to fire Clay items and to cook (with an added bonus of keeping you warm in winter chill when you are within 1 tile of them). There are two main differences between a campfire, an oven and a stove. The first one is their capacity, i.e. the number of objects they can hold and process simultaneously. You can think about it as a number of ‘production slots’. The second one is the time it takes to cook something in the fire - advanced ovens and stoves are much faster at it than the campfire.
 |
Campfire | Capacity: 2 Cooking time: 30 seconds Made with 4 wood logs. The first sparkle of Civilization, the harbinger of metals and pottery, the omen of a fine cuisine, and so on, and so on. |
 |
Iron oven | Capacity: 3 Cooking time: 5 seconds Made with 8 iron ingots. A potbelly-like containment for fire. |
 |
Wood stove | Capacity: 4 Cooking time: 5 seconds Made with 8 steel sheets. A pinnacle of the fireplace technology (so far...) |
The appliances used for manufacturing. Some of them require a certain level of the crafting skill before you are able to use them.
 |
Loom | Made with 8 wood logs. Used to weave cotton and retted fabric into Cloth and to turn shorn wool into Woolcloth. |
 |
Tanning rack | Made with 8 wood logs. Used to turn animal pelts into leather sheets. Skin the carcass with the knife on Grab intent, cut the hair off of the pelt, then hang it to dry on the rack. One extra leather sheet is obtained this way, compared to skinning the carcass directly for leather. |
 |
Retting trough | Made with 8 wood logs. Used to soak fiberous plants into retted fabric. Two units of cotton or flax produce one bundle of retted fabric, which could be turned into Cloth at the loom. |
 |
Acidic bath | Made with 12 steel sheets. Used to soak raw kevlar into prepared kevlar, which is further formed into kevlar sheets at the loom. Raw kevlar recipe requires mixing sulphuric acid (sulphur, hydrogen, oxygen) and any form of refined fuel (not ground-oil petroleum). |
 |
Gunsmithing bench | Skill required: 1.5 + Blueprint Made with 13 wood logs. Used to assemble custom firearms from separate parts starting from the Early Modern age (1903) and to rechamber guns to a different caliber (click the bench with the gun).
|
 |
Blueprint | Skill required: 2.5 + 50 gold coins (or equivalent) A weapon blueprint is produced every time you design and assemble a firearm at the gunsmithing bench. A blueprint could be used to assemble the previously designed firearm by someone with the lower skill level. |
Stock
| Type | Available | Pros | Cons | Cost |
|---|---|---|---|---|
| Rifle wooden stock | 1903 | Cheap, stable, accurate | Heavy, slow to equip | 7 wood logs |
| Carbine wooden stock | 1903 | Cheap, good stability | Somewhat heavy, less accurate than the rifle stock | 5 wood logs |
| Pistol grip | 1903 | Cheap | Very low stability | 3 steel sheets |
| Steel stock | 1943 | Cheap, stable, faster to equip than wooden stocks | Somewhat heavy | 5 steel sheets |
| Folding stock | 1979 | Switchable between folded and extended | Less accurate than fixed stocks even if extended | 7 steel sheets |
Receiver
| Type | Available | Pros | Cons | Cost |
|---|---|---|---|---|
| Bolt-action | 1903 | Very cheap and accurate | Slow reloading (needs to open and close after each shot) | 5 steel sheets |
| Revolver | 1903 | Cheap | Reloading slower than semi-automatic pistols; feeding system restricted to revolving | 4 steel sheets |
| Small semi-automatic | 1903 | Somewhat cheap, good for pistols | Small range, not very accurate | 6 steel sheets |
| Pump-action | 1903 | Cheap, reloading faster than bolt-action | Somewhat slow reloading; feeding system restricted to tubular | 5 steel sheets |
| Small open bolt | 1943 | Cheapest fully automatic option | Fully automatic only, limited accuracy | 8 steel sheets |
| Large semi-automatic | 1943 | Decent accuracy | Expensive | 8 steel sheets |
| Large open bolt | 1943 | High rate of fire | Very expensive, inaccurate | 11 steel sheets |
| Dual selective fire | 1979 | Switchable between semi- and fully automatic | Very expensive | 13 steel sheets |
| Triple selective fire | 1979 | Switchable between semi-, burst and fully automatic | Very expensive | 15 steel sheets |
Feeding system
| Type | Available | Pros | Cons | Cost |
|---|---|---|---|---|
| Internal magazine | 1903 | Cheap, can be clip-fed | Low capacity (5 rounds) | 4 steel sheets |
| Tubular | 1903 | Cheap, higher capacity than internal magazines (8 rounds) | Slow reloading, cannot use clips | 5 steel sheets |
| Revolving | 1903 | Cheap | Very slow reloading | 3 steel sheets |
| External magazine | 1943 | Fast reloading | Somewhat expensive | 8 steel sheets |
| Large magazine | 1943 | Accepts high-capacity drum magazines | Expensive | 10 steel sheets |
| Open (belt-fed) | 1943 | Very high capacity | Inaccurate and unstable | 6 steel sheets |
Barrel
| Type | Available | Pros | Cons | Cost |
|---|---|---|---|---|
| Pistol | 1903 | Cheap | Lowest range | 4 steel sheets |
| Carbine | 1903 | Faster to equip than rifle barrels, decent accuracy | Low range | 5 steel sheets |
| Rifle | 1903 | Accurate | Somewhat expensive, somewhat slow to equip | 6 steel sheets |
| Long rifle | 1943 | Most accurate | Slow to equip | 7 steel sheets |
| Air-cooled | 1943 | Required for machine guns to prevent frequent jamming | Expensive | 9 steel sheets |
These serve to truly extend one’s reach.
An arrow shaft is made with 1 wood log. Could be launched from a bow, but it is very weak on its own. Make arrowheads via casting in the arrowhead mold and attach them to arrow shafts by clicking. You can set arrows on fire by clicking a lit brazier with them. A vial arrowhead (made out of glass) could be filled with a chemical reagent that will be spilled upon hitting a target.
 Stone
Stone |
 Sandstone
 |
 Copper
 |
 Bronze
 |
 Iron
Iron |
 Steel
Steel |
 Vial
Vial |
Gunpowder is produced by mixing mineral coal (carbon, actually), sulphur and saltpeter, 1 unit of each, in a barrel. This produces 9 units of gunpowder. There are alternative ways to acquire ingredients, but for that see the Guide to Chemistry.
Musket ball

Blunderbuss ball

Small musket ball

Musket cartridge

Blunderbuss cartridge

Pistol cartridge

 Pistol casing
 |
 Rifle casing
 |
 Shell casing
 |
 Field cannon casing
 |
 Iron bullet
 |
The steel embodiment of Progress.
The mechanisms that extract and convert the energy contained in various fuels.
Engines could be used dually - as a vehicle engine or as an electric generator. Every type of engine has several key parameters that remain constant, but, for practical purposes, only one key parameter could be taken into account:
The power affects how many pieces of machinery could be powered by an engine if used as a generator, or, if used as a vehicle engine, the maximum weight it could carry.
Engine as a generator
To supply various devices with electricity, the engine has to be connected to them with wires (cables). See the Wiring section for more details.
As a rule of thumb, an engine the size of 1000 cc should be adequate for an average settlement.
To construct any engine, save for the steam engine (which also does not need a fuel tank), you will need the engine maker (made with 5 iron ingots).
Have the engine maker in your active hand and a stack of steel sheets in the other hand.
Click the engine maker, or press Ctrl-Z or Z in the hotkeys mode.
Choose the engine type. Note that different engines need various amounts of steel per 1000 cc.
Enter the size of the engine to build.
Build a fuel tank with steel sheets, take it in hand and connect it to the engine by clicking. To remove a fuel tank, right-click the engine and choose the “Remove fuel tank” command.
  |
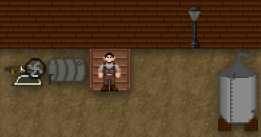
Iron furnace/Steam engine | Power: 45 | Fuel (iron furnace): wood, branches, coal, charcoal, flammable cloth and wooden items | Available at 95 Industrial research. Made with 15 steel sheets (engine), plus 15 iron ingots (furnace). This engine requires an external combustion source, and that is the function of the iron furnace. Build both the furnace and the engine, and place them next to each other, in neighbouring tiles. Add fuel to the furnace and click the furnace to light the fire. Now click the steam engine to start it. As long as the furnace has fire burning and remains next to the engine, the engine will keep working. |
 |
Hot bulb engine | Power: 66 | Fuel: oil, gasoline, diesel, biodiesel, ethanol, olive oil, fat oil | |
 |
Diesel engine | Power: 80 | Fuel: diesel | |
 |
Gasoline 4-stroke engine | Power: 100 | Fuel: gasoline |
There are two kinds of refinery - petroleum and biofuel.
 |
Petroleum refinery | Production rate: every 10 units of raw petroleum => 8 units of gasoline or 7 units of diesel per 1 minute | Made with 22 steel sheets. Used to distill crude oil into gasoline and diesel. |
|
Biofuel refinery | Production rate: every 10 units of olive oil => 7 units of biodiesel; or every 10 units of ethanol => 10 units of refined ethanol | Made with 18 steel sheets. Used to produce ethanol from alcoholic beverages (the stronger, the more efficient) and biofuel from olive oil. |
Operation
 | Bakelizer | Production rate: every 5 units of raw petroleum => 1 plastic sheet per 1 minute | Made with 18 steel sheets. Used to produce Plastic from raw petroleum. |
Operation
The wonderful world of wires!
Once you have a roaring power generator, it is time for electricity to spring forth and animate the silent apparatus, to spread across the world and become its galvanic soul. Here is the process of laying electrical cables.
 |
 |
 |
 |
| 1 | 2 | 3 | 4 |
Make some cables with copper, 1 ingot per every 10 meters of cable (1 m - 1 tile). Stand in one place to make the cable in a single coil, which could be up to 50 m in length.
Lay the cable on the ground by clicking it in your active hand, pressing Ctrl-Z or Z in the hotkeys mode.
The cable is placed horizontally when you are facing West or East, and vertically, if facing North or South. Cables that cross on a single tile are automatically connected upon placement.
If you are placing cables over some kind of floor, the cables are automatically placed under the floor tiles and concealed from view. You can make them visible by right-clicking the floor tile and selecting the “Under/over covers” command for the cable.
You can cut and remove cables with the knife.
Connect the machinery (you may need to secure it with the wrench first, in which case there will be a message). Stand close to it and click it with the cable - you will see a message. Do not place cables under the machinery beforehand, it will remain unconnected. Remember to place another wire at the tile you are standing on.
Fire up the generator! Should a new piece of machinery be connected to the existing network, the generator must be restarted to power the new element.
 |
Electronic circuits | Electronic circuits (or electronics) are made from copper and iron (requires 2.2 of the crafting skill). Hold copper ingots in the active hand and iron ingots in the off-hand. Click copper ingots and choose "electronic circuits". Electronics are used to assemble various devices, such as phones and radios, cameras, the Geiger counter, and the TV set. |
It is 1903, eh? You got gas, a refinery, even gas pumps, but no vehicles? Well, you are in luck, now you will learn you all the inner workings of creating your very own motorcycle! Just set aside a bunch of steel and follow the steps below.
 |
 |
 |
 |
 |
| 1 | 2 | 3 | 4 | 5 |
Bikes have 4 speeds. Stopped (neutral), 1st gear (moving slowly), 2nd gear (moving faster than the 1st), and 3rd gear (fastest - you crash on this speed, you are sure to break something).
Mount your bike by click-dragging your icon onto the bike. You can get off by clicking on the bike with the handle bars in hand (this also shuts off the bike. Two clicks - shut off the bike, then another on to get off).You turn on/increase speed of the bike by pressing Z. You can stop/decrease speed by pressing C. Drive safe out there!
Rafts and outriggers do not befit a true naval power, so when your nation has its eye on distant shores, it may be just the time to open shipyards and commission a man-of-war or two.
Shipyard considerations
While selecting a place for shipbuilding, keep in mind the following:
Shipbuilding
 |
 |
 |
 |
| 1 | 2 | 3 | 4 |
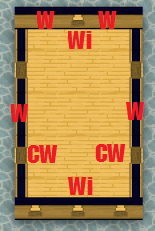
You can fix the walls and frames and the mast in place with the wrench to avoid pushing them on accident, but it is not necessary.
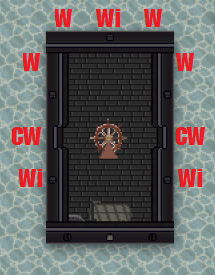
Click ship frame tiles with wood logs to place walls and windows. Enter the desired thickness for every wall in millimeters.
Wall (W) - just a wooden impassable wall. Examples of walls are in the middle and at the bow of the ship on the picture.
Crenelated wall (CW) - a wall with a doorway that could be used to enter or leave the ship. Examples of crenelated walls are on the left and right side of the ship on the picture, two on each side, closer to the bow and the stern.
Window (Wi) - just a cosmetic option. On the picture, there is a single window at the bow and three at the stern.
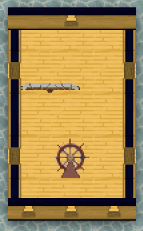
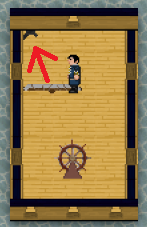
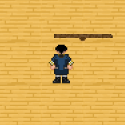
The mast is actually larger than 1 tile, so its positioning is a bit quirky. See the picture below - this is how the mast is built when facing North:
 |
|
Indispensable political instruments in later ages, perfectly suited for settling disputes and establishing accord on all fronts.
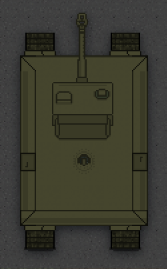
Tank driving is covered in the Guide to Tanks.
Limitations
The maximum size of a tank is 5x5 tiles. Larger ones will not function properly due to technical reasons.
A tank has to be of rectangular shape.
A tank is facing North by default.
 |
 |
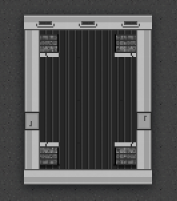 |
 |
| 1 | 2 | 3 | 4 |
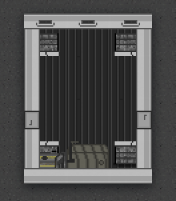
 |
 |
 |
 |
| 5 | 6 | 7 | 8 |
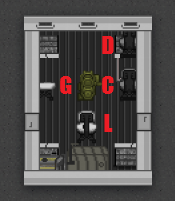
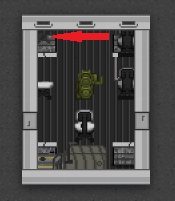
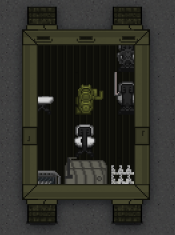
Everything inside the tank, except for the tank tracks and the vehicle axis, could be placed anywhere.
You can fix the walls and frames and the tank cannon in place with the wrench to avoid pushing them on accident, but it is not necessary.
Place tank tracks inside the walls and on the frame itself. Face North to build tracks like those in the front, or South to build them like those in the back.
Construct an engine with a fuel tank.
It is important to make an engine of an appropriate size that produces enough power to carry a tank and its load. A weak engine will not be able to move the weight of a tank. You can check engine’s maximum power by examining the engine. For instance, the weight of the tank built here is approximately 650 without any crew or shells. You can check the current weight by examining the steel frame inside the tank (“floor”) once its construction has been finished.
As a rule of thumb, an engine of 8000-10000 cc should be more than enough for a medium-sized tank.
Place the tank cannon (enter the desired caliber) and the seats: D - driver, C - commander, L - loader, G - gunner.
Build a heavy vehicle axis at the top left corner. Click the axis to select a colour palette and a name for the tank.
Admire the interior of the death machine you have created (place a shell rack, the one beside the fuel tank, to keep things organized)…
Repairs
Maintained by the
Civ13 team — (Source Code)
Hosted on GitHub Pages — Powered by
Git-Wiki v2.8.1