Trains
Rails and steam trains move people, fuel and cargo along a fixed track. Everything is built from the crafting menu's trains section, mostly from iron, once your faction has the research.
Research
| Mode | Rails, rail switchers, rotator platform, lever | Steam locomotive, tender, cabin, flatbed and transport wagons |
|---|---|---|
| Tech tree | Rail & Steam node (Vehicles line) | Industrial research 101 |
| Legacy research | Industrial research 93 | Industrial research 101 |
The wooden mining cart needs Industrial research 93 in either mode.
What you can build
| Piece | Cost | Notes |
|---|---|---|
| Rail (vertical or horizontal) | 1 iron | Straight track. |
| Rail (left turn) | 1 iron | A curve joining the direction you face to your left. Face each way in turn to build all four corners. |
| Rail switcher (to left or right) | 2 iron | A junction that a lever can switch between going straight and turning off. |
| Rail rotator platform | 3 iron | Turns whatever wagon is standing on it. |
| Train lever | 1 iron | Flips every switcher within two tiles. |
| Mining cart | 10 soft wood | Small storage cart (7 slots). |
| Steam locomotive | 18 iron | The engine. Burns coal or wood. |
| Coal tender | 6 iron | Fuel wagon (15 slots) for coal. |
| Cabin wagon | 4 iron | A covered seat for the driver or passengers. |
| Flatbed wagon | 4 iron | Carries people, crates and structures. |
| Transport wagon | 5 iron | A covered storage wagon (8 slots). |
Each piece is placed facing the way you face, so stand looking along the line you want before you build it.
Laying track
- Lay straight rails end to end. A train only moves onto a tile that has a rail running in its direction.
- Use curves for corners, switchers for branches and a lever within two tiles of each switcher you want to control.
- Put a rotator platform at the end of a line or in a yard to turn wagons around. Click it to rotate it a quarter turn, or right-click it for Rotate Left and Rotate Right.
- Keep the track clear. A moving train stops when it hits anything solid, and it smashes what it hits.
Fuel
Click the locomotive with fuel to load its combustion chamber, which holds 100 units.
| Fuel | Units per piece |
|---|---|
| Coal | 15 |
| Wood | 3 |
If a stack would overfill the chamber, it is refused, so split it into a smaller stack. The locomotive burns one unit per tile it moves, and it slows down as the chamber empties. Examine it to see how full it is ("full", "sufficiently fueled", "stable", "emptying", "almost empty"). When the fuel runs out, the engine stalls.
Carry spare coal in a tender hitched behind the engine for long routes.
Building a train
- Place the locomotive on the rail, facing the way you want to go.
- Place each wagon on the rail behind it, facing the same way as the engine.
- Right-click a wagon and choose Hitch to couple it to the wagon in front of it. Use Hitch again to uncouple it. Hitched wagons follow the one ahead.
Driving
- Click the locomotive to start it and click it again to stop. It drives forward along the track until it is stopped, runs out of fuel, reaches the end of the rail or hits something.
- Set the levers before you leave. A switcher set to split sends the train onto the side track.
- Anyone standing on the track gets hit hard. Look before you start and warn people near the line.
Carrying passengers and cargo
- Storage wagons (mining cart, tender, transport wagon): click to open their storage, or drag items onto them.
- Flatbed and cabin wagons: drag a person onto the wagon to bring them aboard, or drag yourself to climb in. Standing on the wagon with someone, you can buckle them in. Drag a loose crate or structure onto a flatbed to secure it for the ride, and right-click the wagon and choose Unsecure to release it at the other end.
Through station and service loop
This example separates an eastbound main line, a passenger platform track and a cargo/service loop. It uses all six craftable rail types: horizontal, vertical, left turn, left switcher, right switcher and rotator, plus four levers. It is a source-derived layout, not an in-game-tested station or a guarantee of collision-free operation.
The platform and cargo stopping positions allow eight vehicles including the locomotive and tender. That is a layout choice, not a train-length limit. Extend the straight stopping tracks and clearances for a longer train.
Layout views
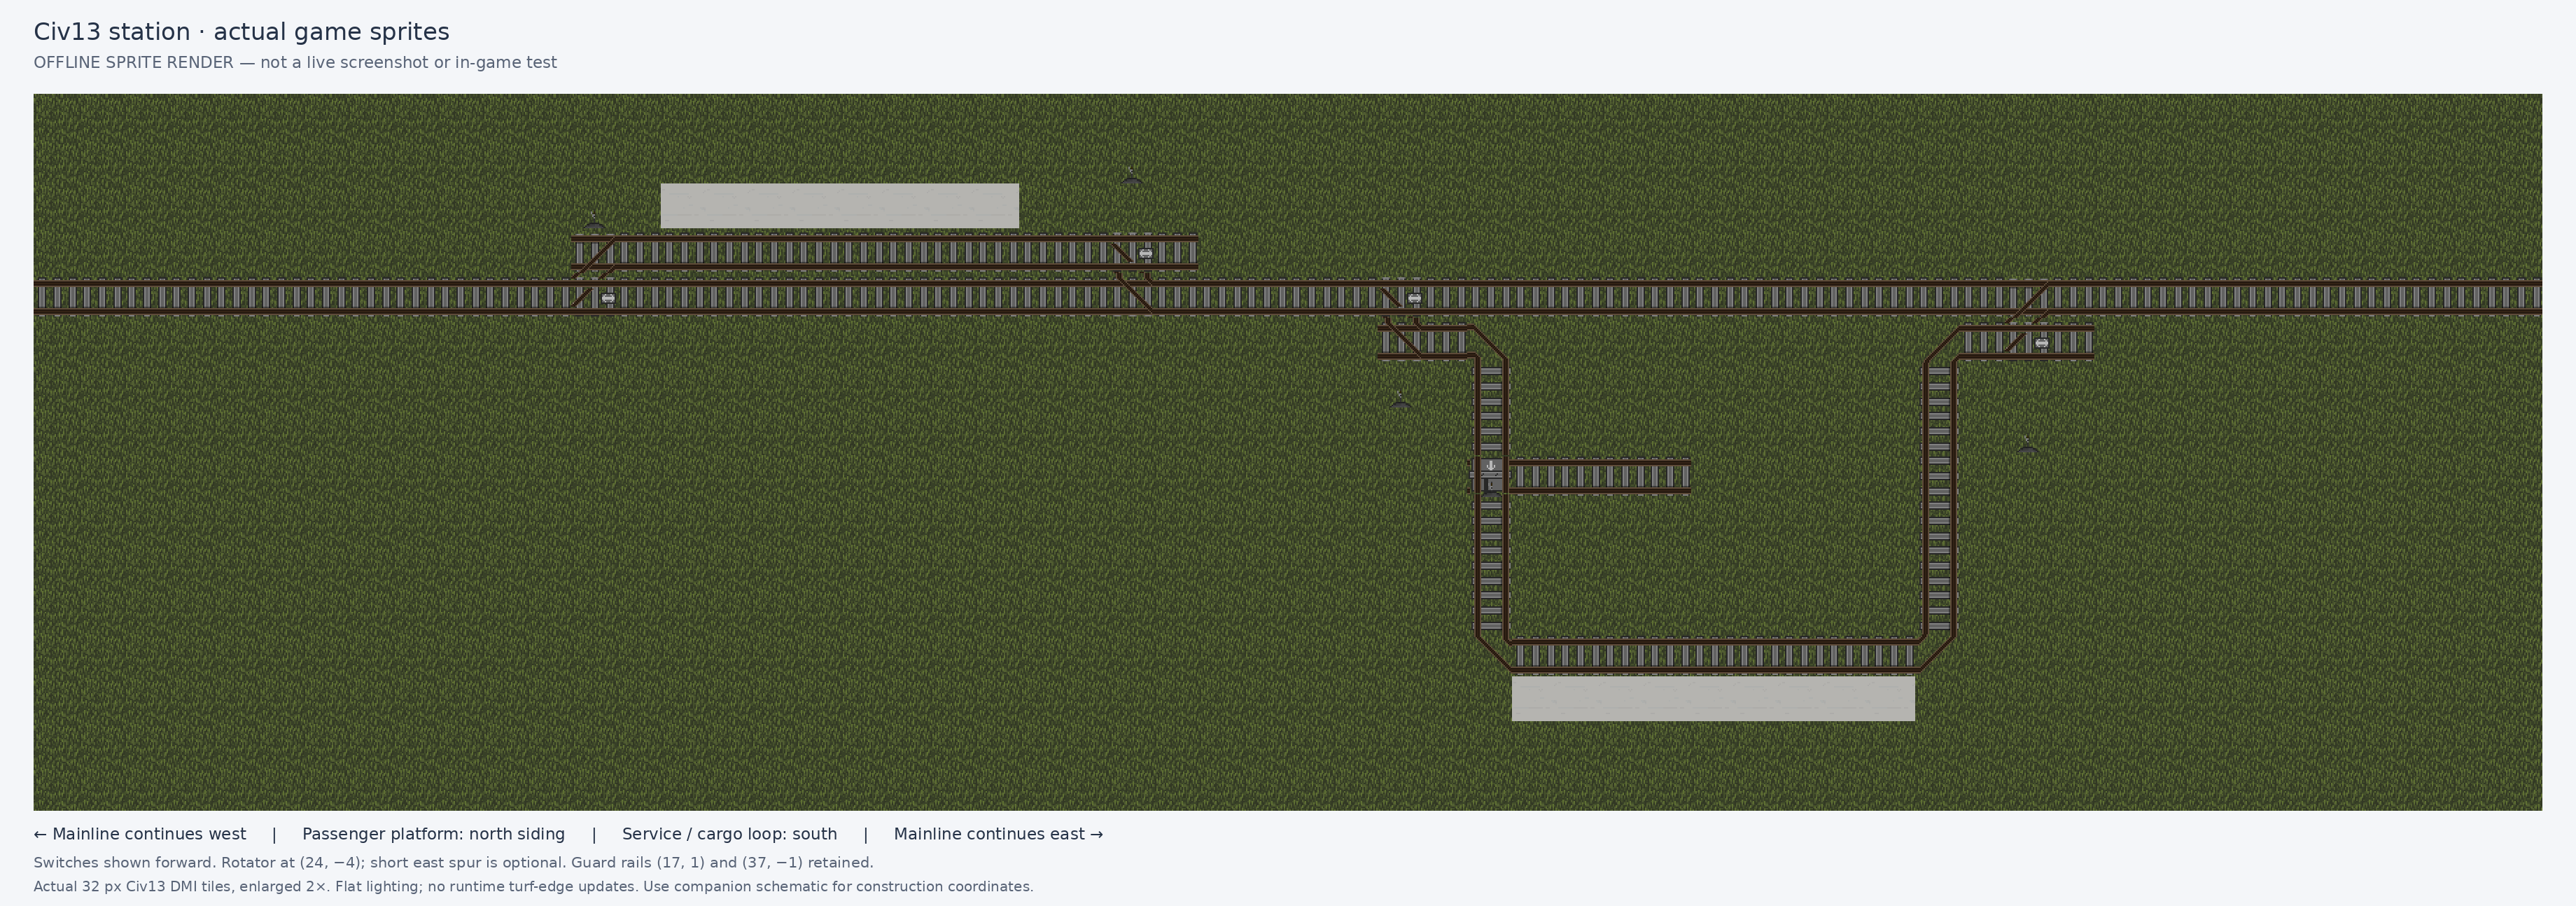
Offline render using actual Civ13 sprites; not a live screenshot or in-game test. Main line continues beyond both station ends; flat lighting and no runtime turf-edge updates. Open the full-size sprite render.
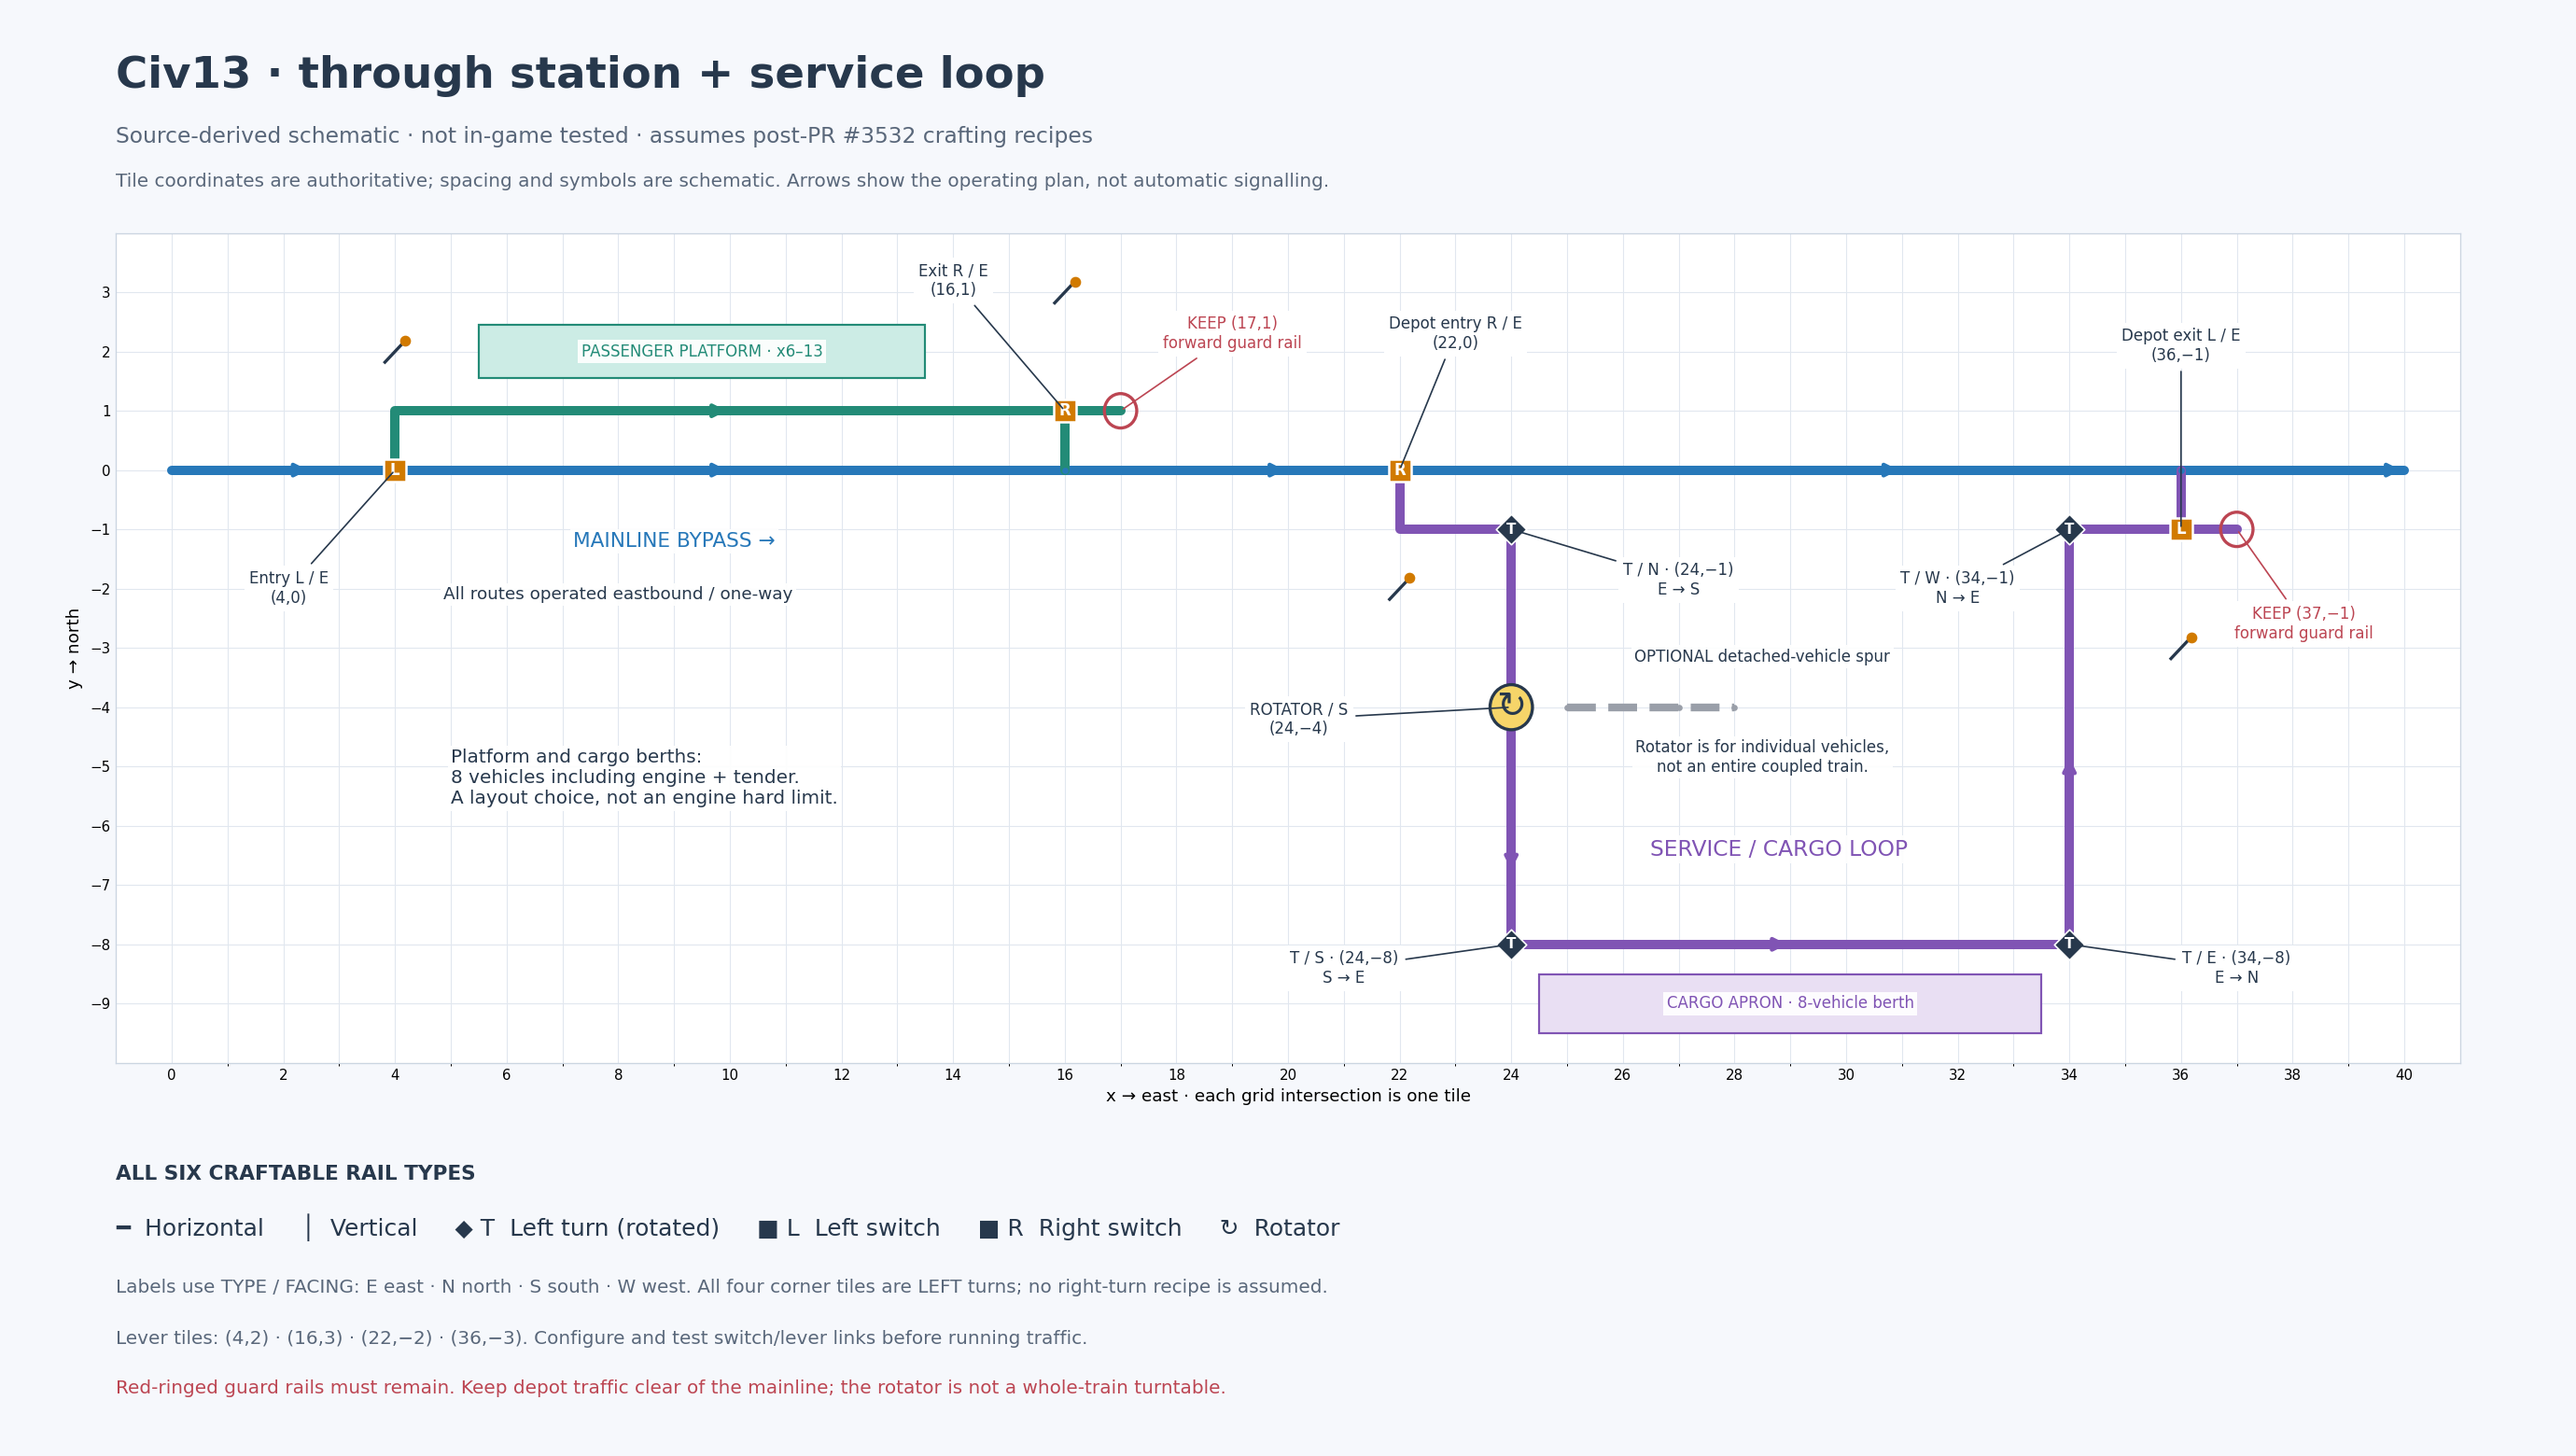
Construction schematic; use the coordinates below when placing track. The arrows indicate a continuing main line, not buffer stops: keep whole-train staging space to the west and exit rail through at least x=44 to the east. Open the full-size schematic. Sprite assets come from the Civ13 game source, under its game-source license.
Coordinates and track plan
Choose a clear area and treat any convenient tile as (0,0). Increasing x is east; increasing y is north. All ranges below include both endpoints. Facing means the direction to face when crafting the piece. Use one rail piece per listed tile; switches, turns and the rotator replace the straight rail at their coordinates.
| Section | Tiles and pieces |
|---|---|
| Main line | Horizontal rail along y=0, except the two entrance switchers below. The drawn x=0..40 segment is part of a continuing eastbound route, not two buffer stops. Continue west far enough to stage the whole train before the first entrance, and east through at least x=44 for this eight-vehicle layout. Longer trains need longer clear approach and exit tracks. |
| Passenger entrance | Left switcher, facing east, at (4,0). Its split route shifts to (4,1). Lever at (4,2). |
| Passenger track | Horizontal rail from (4,1) to (17,1), except the exit switcher. |
| Passenger platform | Build alongside the track from (6,2) to (13,2); stop the eight-vehicle train beside it on x=6..13, y=1. Keep both approaches clear. |
| Passenger exit | Right switcher, facing east, at (16,1). Its split route shifts to (16,0). Lever at (16,3). Keep horizontal rail at (17,1). |
| Depot entrance | Right switcher, facing east, at (22,0). Its split route shifts to (22,-1). Lever at (22,-2). |
| Depot approach | Horizontal rail at (22,-1) and (23,-1), leading to the first turn at (24,-1). |
| West leg | Vertical rail at x=24, y=-2..-7, except the rotator at (24,-4). |
| Cargo straight | Horizontal rail from (25,-8) to (33,-8). An eight-vehicle stopping position is x=25..32; leave x=33 clear. Put the cargo apron alongside at y=-9. |
| East leg | Vertical rail at x=34, y=-7..-2. |
| Depot exit approach | Horizontal rail from (35,-1) to (37,-1), except the exit switcher. |
| Depot exit | Left switcher, facing east, at (36,-1). Its split route shifts to (36,0). Lever at (36,-3). Keep horizontal rail at (37,-1). |
| Rotator | Replace the west-leg rail at (24,-4) with a rotator facing south for through traffic. |
| Optional service spur | A separate horizontal track from (25,-4) to (28,-4), beside the rotator. Use it only for an unhitched vehicle. |
All four depot corners use the craftable left-turn recipe:
| Corner | Craft facing | Incoming travel | Outgoing travel |
|---|---|---|---|
(24,-1) | North | East | South |
(24,-8) | South | South | East |
(34,-8) | East | East | North |
(34,-1) | West | North | East |
The layout does not require a separate right-turn recipe, end rail, wide curve, corner piece or plain split.
Switches and guard rails
A split switcher moves the vehicle one tile sideways without changing its heading. It is not a curve. The passenger route therefore enters and leaves its parallel track while continuing to face east; the depot uses actual turns for its loop.
Keep the forward guard rails at (17,1) and (37,-1), even though normal exit traffic leaves sideways. A switcher currently checks for compatible rail straight ahead before taking its split route. The main line supplies the equivalent forward rail beyond the entrance switchers. Do not remove these forward rails as unused track.
A lever changes every switcher within two tiles, rather than linking to one selected switch. The four lever positions above keep the intended controls apart. If you move a lever or add another nearby switcher, check which switches it reaches and inspect their settings before admitting a train.
Operating the routes
| Route | Passenger entrance at (4,0) | Passenger exit at (16,1) | Depot entrance at (22,0) | Depot exit at (36,-1) |
|---|---|---|---|---|
| Express bypass | Forward | Not used | Forward | Not used |
| Passenger stop | Split | Split | Forward | Not used |
| Cargo/service loop | Forward | Not used | Split | Split |
- Keep people, cargo and other trains off the intended route. Confirm the main line and the exit merge are clear.
- Set the required switches before the train enters. Leave the settings alone until the whole train, including the last wagon, has cleared the switches.
- For a passenger stop, use the north platform track and stop the locomotive manually with the train beside the platform.
- For cargo, follow the depot loop in this order: east into the approach, south down the west leg, east along the cargo straight, north up the east leg, then east to the main-line exit. Stop manually alongside the cargo apron.
- Before rejoining the main line, wait for a clear merge and have an operator keep other traffic out. For this eight-vehicle train leaving the depot at
(36,0), continue until the locomotive reaches at least(44,0)and the last wagon has cleared the exit switch. Keep that exit track clear; the drawing ends before the required clearance does. Restore entrance switches to forward after the whole train is clear if through traffic is next.
There is no automatic station stop, signalling or route reservation in this plan. A bypass track does not protect a train entering at the exit merge. Use manual dispatch, allow stopping distance and run only traffic the operators can keep separated.
Using the rotator
The rotator changes the heading of vehicles on its own tile. It does not turn an entire coupled train or reverse a whole consist.
Stop and unhitch the individual vehicle before turning it toward the optional east-facing spur. Clear the surrounding tracks, rotate the vehicle into the required direction and use the short spur only for detached-vehicle handling. Restore the rotator to south before another train uses the west leg. Do not rotate it beneath a moving or coupled train.