Miscellaneous Crafting
Details on crafting certain things that fall somewhat outside the main guide.
Leather tanning
Animals provide untanned raw hides or species pelts. Turn them into ordinary leather by scraping, washing, drying and applying bark tannin. Each raw hide or pelt piece yields 1 leather sheet. Keep pelts if you want to use their fur clothing or other pelt recipes instead; scraping consumes the chosen pelt piece. Finished leather you already own remains usable without further processing.
What you need
- Raw hides or pelts from animal harvesting. Adult male and female turkeys each give 1 raw hide piece; turkey chicks give no hide. Species pelts retain their existing yields and uses.
- A held sharp tool, such as a knife or sharpened flint, for scraping.
- An accessible open reagent vessel containing water or tannin as required below. Wood mugs, canteens, buckets and other suitable open liquid containers work. Hold the vessel and apply it to nearby bark or a hide, or hold the bark, prepared hide or dry hide and click a reachable open vessel or unlocked barrel on the ground. Keep both objects within reach.
- A tanning rack, made with 8 wood logs in the ordinary wood catalog. Basic Toolmaking is required where research applies; mode and crafting restrictions still apply.
- Bark collected while cutting logs into planks, and water for extracting tannin.
Sealed vessels, locked barrels, another player’s inventory and nested storage cannot supply these liquids. The water or tannin must be in the vessel’s actual reagent contents. Terrain water and a cooking pot’s separate cooking-water counter do not count; use an ordinary reagent vessel for these steps.
Process
| Step | Action and cost | Result |
|---|---|---|
| Scrape | Use a held sharp tool on a nearby raw hide or pelt. The action takes 50 ticks, normally five seconds, and consumes 1 piece only on successful completion. | 1 prepared hairless hide |
| Wash | Use an accessible reagent vessel containing at least 5 units of water with a prepared hide, using either interaction above. This consumes 1 prepared hide and 5 water. | 1 wet hide |
| Dry | Put a held wet-hide stack on the tanning rack. The whole stack, up to 50 pieces, takes 300 ticks, normally 30 seconds. Retrieve it with an empty hand when ready. | The same number of dry hides |
| Tan | Use an accessible reagent vessel containing at least 5 units of tannin with a dry hide, using either interaction above. This consumes 1 dry hide and 5 tannin. | 1 ordinary leather sheet |
Washing and tanning process one piece per application. Apply the vessel again for another piece. Prepared hairless hides you already own enter at the washing step. Drying alone does not produce finished leather, and splashing a stack does not process the whole stack.
Keep the tool and hide in place while scraping. Cancellation or losing the tool, actor or input leaves the hide unspent. To cancel rack drying, click the rack with an empty hand and take back the wet hides; loading them again starts a fresh full drying interval. A saved wet batch also restarts its full interval when the server restarts. Rack destruction releases its contents. Remove the completed batch before loading another.
Bark and tannin
Cut logs into planks with the usual tools. A hatchet consumes 2 log units for 1 plank and 2 bark pieces; a saw consumes 1 log unit for 4 planks and 1 bark piece. Bark is a byproduct of paid log cutting, not a free supply.
Use an accessible reagent vessel containing at least 10 units of water with one bark piece, using either interaction above. 1 bark + 10 water produces 10 units of tannin in that vessel. The liquid volume stays the same, so extraction also works with a full vessel. Each application processes one bark piece.
For two hide pieces, budget 2 hides, 1 bark and 20 water: ten water washes the hides, and ten water makes the ten tannin needed to finish both. Tool, rack, research and normal resource-acquisition requirements still apply.
Parchment
Stop before tanning to make parchment, a blank writing sheet that works like paper for notes, books and research. Use any held sharp tool, such as a knife or hatchet, on a nearby dry hide. Cutting takes 50 ticks, normally five seconds, and turns 1 dry hide into 4 sheets of parchment at your feet. Interrupted cutting consumes nothing. The cut itself needs no research; the scraping, washing and drying before it need Basic Toolmaking where research applies.
The Crafting Atlas lists the hide stages, bark and tannin acquisition, parchment and leather recipes. In game, use a tanning rack’s Processing Reference to open its drying route and find the rack’s construction recipe and research requirement.
Tanning drum
Once your faction has Factories research, a powered tanning drum does every step for you: load hides at any stage, bark, water and tannin, give it power, and it makes one leather sheet every two seconds at the same liquid cost as tanning by hand. Factory arms and pipes can keep it supplied.
With Synthetic Fabrics research, a factory fabricator makes synthetic leather from cloth and plastic, with no hides at all. It crafts everything ordinary leather does.
Woodworking without an axe
Before you have an axe or saw, you can whittle logs into tools and planks by hand. Where research applies, every step needs Basic Toolmaking; on worlds where research is kept in books, anyone can do it without that chapter. Keep the tool in your active hand and stay still while you work. Stronger characters work faster.
- Cut a small wood piece: use sharpened flint, or a knife harder than wood (a flint knife works, a wooden one does not), on a stack of wood logs. After about 12 seconds one log becomes 1 small wood piece and 1 piece of bark.
- Whittle tools: use sharpened flint or the knife on your small wood pieces
and choose:
- Wooden wedge: 1 piece, about 12 seconds.
- Wooden mallet: 5 pieces, about 24 seconds.
- Split a crude plank: hold the wooden wedge in one hand and use the wooden mallet from your other hand on a stack of at least 2 logs. After about 24 seconds you get 1 crude plank and 2 bark. The wedge wears a little each time.
- Flatten it: use sharpened flint, or any sharp tool that is not made of wood, on the crude plank. After about 8 seconds it becomes 1 wooden plank. Crude planks cannot be used as finished planks until flattened.
Knives lose a little durability with each cut; sharpened flint does not.
A bound flint axe is faster once you have one: make a sharpened stick (sharpened flint on a stick), carry crude twine, sinew or rope, and use sharpened flint on the sharpened stick. An axe cuts 2 logs into 1 plank and collects bark. Bark soaks into tannin for leather tanning.
Lard candle
 |
Lard candle | Fill a vessel with at least 5u of lard (made from animal fat), then click the vessel with rope (1 rope per 1 candle; rope is made from flax and cotton. Light it from any open flame: use a lit match, lighter, torch, tiki torch, oil lamp or another lit candle on it, or hold the candle to a lit tiki torch, campfire, stove, brazier or wall torch. Electric flashlights and glowsticks will not light it. A lard candle lasts about 30-40 minutes. |
Lard soap
 |
Lard soap | To make 1 soap bar, mix 20u of lard and 2u of lye (obtained from wood ash) in a vessel like a bucket, a barrel etc. |
Custom flags
A custom flag maker is crafted from 4 cloth (Banners & Flags, needs Regalia & Heraldry). Use it in your hand and choose Design it to pick a background, halves, thirds, a cross, a saltire and a symbol, then name the flag. It hangs where you stand. To dress a flagpole instead, use the flag maker or 5 cloth on it, then click the flag to pick its cloth colour, symbol and symbol colour.
Every finished flag has a design code, a short line of text starting with
C13FLAG/ (hanging flags) or C13POLE/ (flagpoles). Right-click the flag and
choose Show Design Code to copy it. To make the same flag again, choose
Use a design code on a new flag maker, or on a blank flag on a pole, and
paste it in.
Faction symbols for banners have their own codes, starting with C13SYMBOL/;
see Civilizations and Nomads.
Tailoring your own clothes
Design, cut and sew clothing, overclothes, hats, gloves, footwear and belts in your own colours. You need Weaving to start a project, and each garment needs the same knowledge as its ready-made version, so the list of garments grows as you learn more.
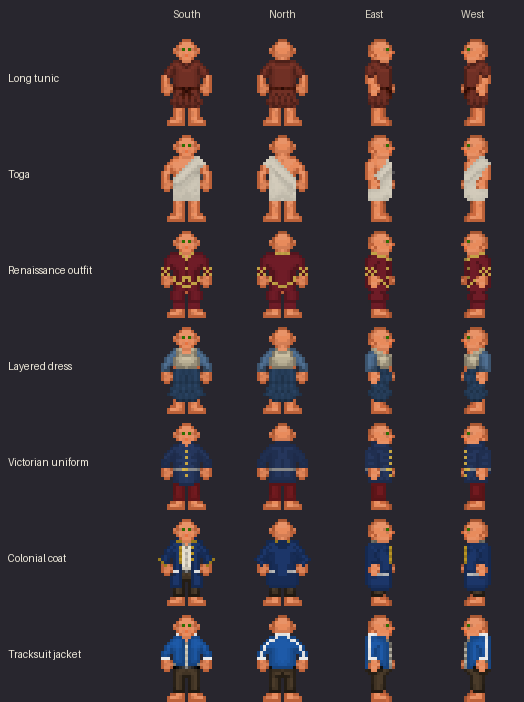
- Open the cloth crafting menu and make a tailoring project under Clothing. It costs one cloth sheet; woolcloth works too.
- Bigger garments need more fabric. Use cloth or woolcloth sheets on the project to add them, up to eight. A loincloth needs 1, a toga 3, most outfits 4 and a colonial coat 7. Every sheet must be the same fabric as the first one.
- Hold the project and use it in hand. Choose garment lists the clothing, overclothes and headwear you know how to make, with the fabric each one needs.
- Colours lets you colour the body of the garment and each of its pieces, such as sleeves, skirt, trim, buttons or stripes. A preview of all four sides stays at the top left of your screen while you design. Nothing is spent while you design, and you can change your mind as often as you like.
- Cut fabric asks you to confirm, then takes about 3 seconds. Cutting locks the garment and colours for good, and any spare sheets are set aside.
- Use the cut pieces in hand and choose Sew. After about 6 seconds you hold the finished garment.
| Knowledge | Garments |
|---|---|
| Weaving | loincloth, long tunic, tribal robe, shirt, knee tunic, cloak, hood, bandana, beanie, round hat, pointed hat |
| Classical Dress | shendyt, celtic trousers, toga, stola, gown, skullcap, veil, keffiyeh |
| Tailoring | arabic tunic, haori, renaissance outfit, short colonial outfit, poncho, haori jacket, colonial jacket, colonial coat, jacket, coat, beret, feathered cap, hennin, soft hat |
| Fine Garments | tunic, layered, buttoned and laced dresses, pontifical robes, pyjamas, colonial outfit, noble hat, infantry cap, tall hat |
| Textile Mills | victorian uniform, peaked cap |
| Ready-Made Clothing | modern, baggy and short modern outfits, cloth jacket, blazer, hoodie, field cap |
| Synthetic Fabrics | tracksuit jacket |
Hats take one or two sheets. The feathered cap’s feather, the keffiyeh’s checks and the peaked cap’s band and badge each take their own colour, and a veil covers the hair. Round, pointed, soft and tall hats are put together from pieces of your choice; see Hats from pieces.
Fabric and dyes
The fabric you start the project with decides how the garment wears. Wool is warmer, especially as a coat or cloak, and gives a little padding against cuts and arrows. Linen (cloth) is lighter and shows dyes brighter, while wool gives every colour a warmer, duller look.
Each colour is a dye, and the dyes you can use depend on your knowledge. Textile Mills lets you mix any colour you like.
| Knowledge | Dyes |
|---|---|
| Weaving | undyed, oatmeal, walnut brown, ochre yellow, red ochre, charcoal grey, pale woad blue, moss green |
| Classical Dress | madder red, weld yellow, woad blue, forest green, lichen purple, oak-gall black, rose madder, saffron orange |
| Fine Garments | kermes crimson, indigo navy, royal purple, cochineal scarlet, verdigris teal, gold yellow, sky blue, rose pink |
Choosing pieces
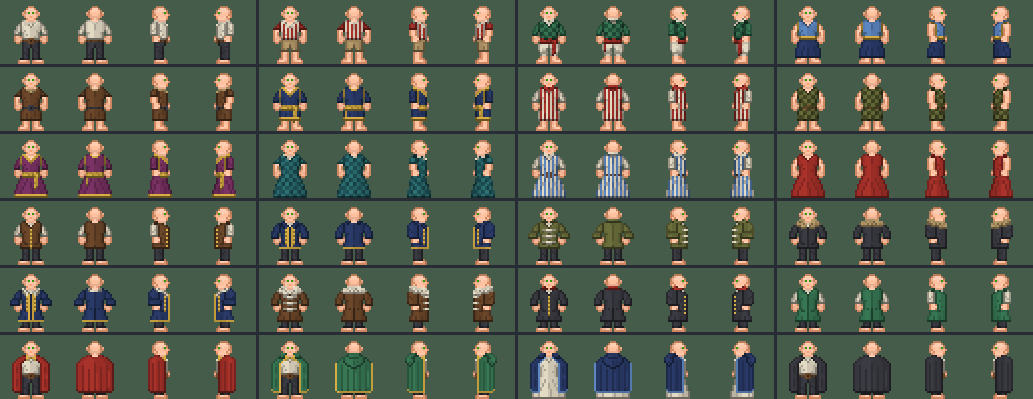
Shirts, knee tunics, gowns, jackets, coats and cloaks are put together from pieces. With one of them chosen, Pieces lets you pick each part, and every part you add gets its own colour under Colours.
| Garment | Pieces |
|---|---|
| Shirt | sleeves, neckline, legwear (trousers, shorts, breeches or skirt), belt or sash, pattern |
| Knee tunic and gown | sleeves, neckline, belt or sash, pattern |
| Jacket and coat | sleeves, collar, buttons or toggles, edge trim |
| Cloak | hood, clasp, border |
Necklines can be round, V or high; patterns can be stripes, checks or a hem band; and collars can be a stand collar, lapels or fur. Leaving off the sleeves of a jacket makes a waistcoat. Long sleeves, a hood and legwear take extra fabric, and the menu shows how much. A few pieces need more knowledge than the garment itself: V necks, breeches and checks need Tailoring; high collars, lapels, double buttons and cuffed sleeves need Fine Garments; and a sash needs Classical Dress.
Hats from pieces
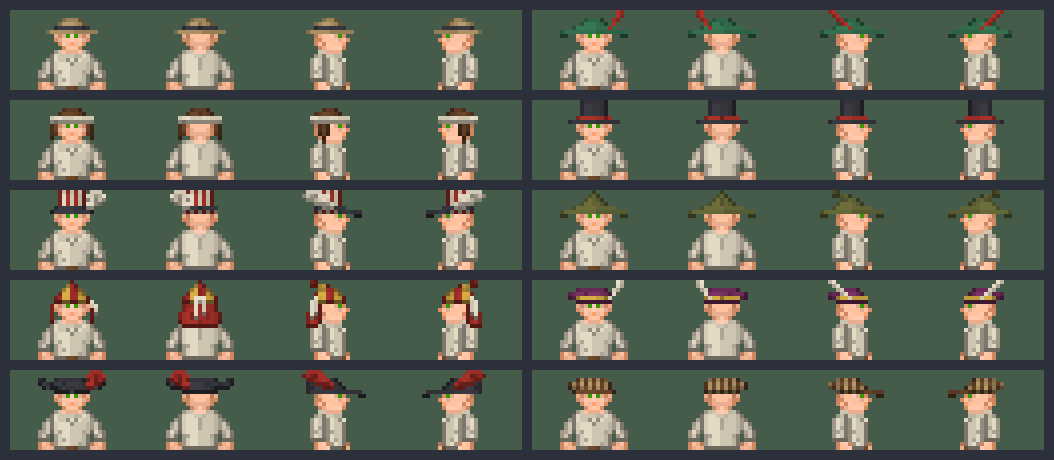
Round, pointed, soft and tall hats start as a bare crown. Pieces adds up to five parts to it, and each part takes its own colour under Colours, so one hat can carry six colours.
| Part | Choices |
|---|---|
| Pattern | plain, stripes, panels |
| Band | none, band, fur trim |
| Brim | none, narrow brim, wide brim, peak, cocked brim |
| Flaps | none, ear flaps, neck cloth |
| Decoration | none, feather, plume, badge, ribbons |
Every part fits every crown, so a soft hat with a cocked brim and a plume, a tall hat with a narrow brim and a band, or a round hat with fur trim and ear flaps are all the same few choices. A wide brim, a cocked brim, ear flaps and a neck cloth each take one more sheet of fabric. Panels, the wide brim, feathers and ribbons need Tailoring; the neck cloth and badge need Classical Dress; the cocked brim and plume need Fine Garments; and the peak needs Textile Mills.
Naming a design. Before cutting, choose Name to give your design its own name of up to 32 letters. The finished garment carries that name, and anyone who examines it sees who designed it. Leave the name empty to keep the garment’s usual name.
Sewing patterns
A sewing pattern lets you sew the same design again or hand it to another tailor. Hold a blank sheet of paper or parchment and use it on a designed project, a finished tailored garment or another pattern. After about 3 seconds the sheet becomes a sewing pattern with the garment, its name and every piece’s colour noted on it. Examine a pattern to see the colours and how much fabric it needs.
Use a pattern on a project that has not been cut yet to copy its design onto the project. You still need the knowledge for that garment and its dyes, so a pattern for something you have not learned will not work for you yet. A pattern does not record the fabric, so the same design can be sewn in linen or wool. Patterns can be traded like any other item.
Pattern book
Your pattern book keeps up to 20 of your designs, and every character you play on the same server can use it, even a new one. Use an uncut project in hand and choose Pattern book to save the current design, copy a saved design onto the project or remove one. Using a sewing pattern in hand also offers to copy it into your book. Loading a design from the book needs the same knowledge as loading a pattern.
The pattern book can also give a design as a design code, a short line of
text starting with C13CLOTH/ that you can keep outside the game or send to a
friend. Choose Copy a design code and pick the design, or use a sewing
pattern in hand and choose Show design code. To use one, open Pattern
book on an uncut project and choose Paste a design code. The design goes
onto the project as if you had loaded a pattern, so you still need the
knowledge for that garment, its pieces and its dyes.
Stand still and keep the project in your hand while cutting or sewing. If you are interrupted, the project and any finished cutting are kept, so just start that step again. A finished garment takes the usual clothing accessories such as sashes, aprons and capes, and a tailor can still make minor alterations to it.
Gloves, footwear and belts
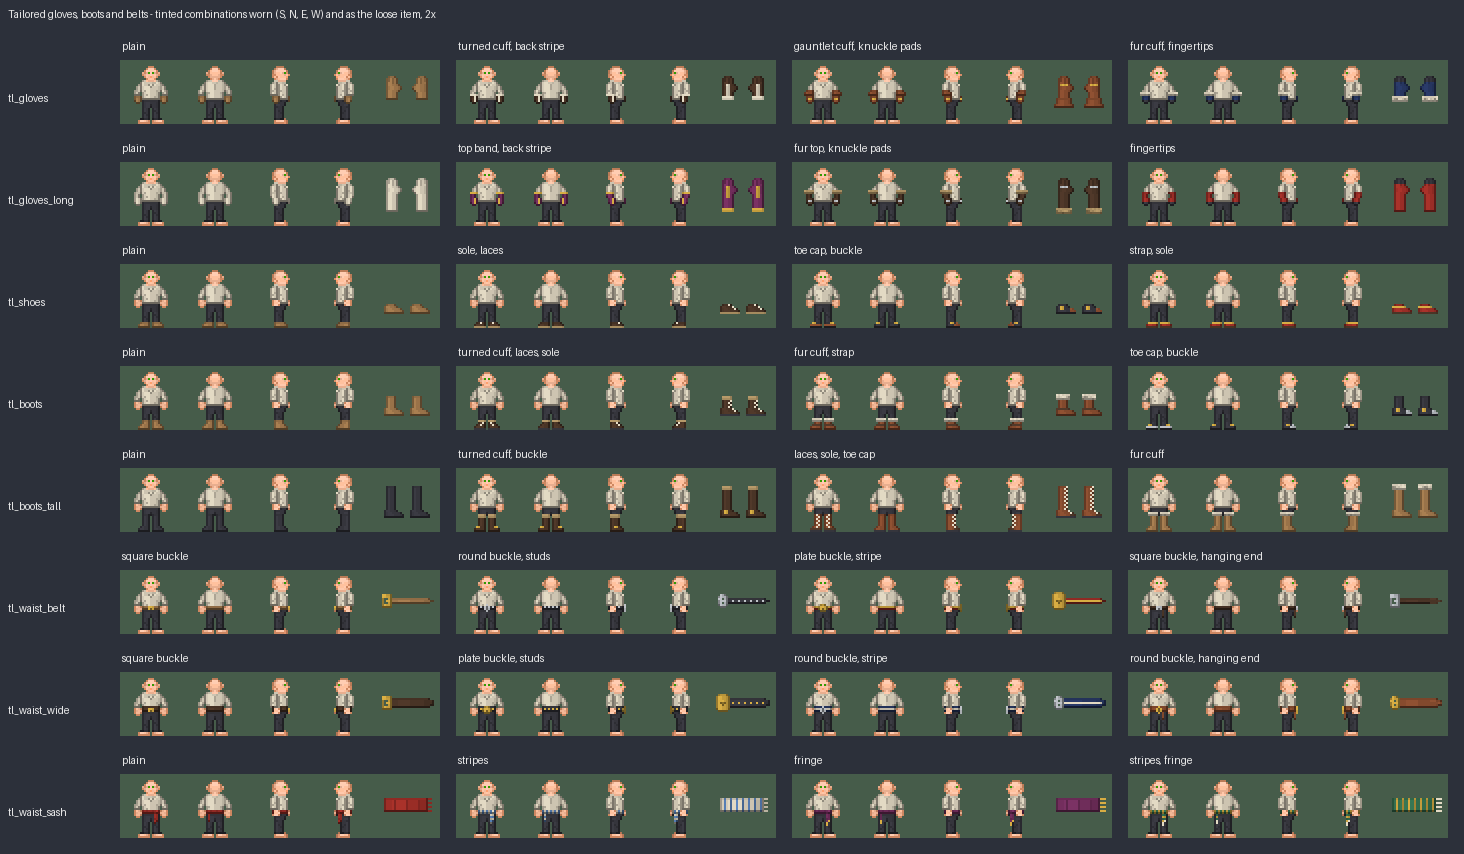
Gloves, shoes, boots and belts are designed the same way, from leather. Open the leather crafting menu and make a tailoring project under Clothing for one leather sheet, then add more leather sheets for bigger items. Gloves can also be made from a woolcloth project, and a waist sash from a cloth or woolcloth one. A project only lists what its material can make, and leather shows its own tan through every dye.
| Item | Knowledge | Sheets | Pieces |
|---|---|---|---|
| Gloves | Weaving | 2 | cuff (turned, gauntlet or fur), back (padded or striped), capped fingertips |
| Long gloves | Tailoring | 3 | top (banded or fur), back (padded or striped), capped fingertips |
| Shoes | Classical Dress | 2 | thick sole, toe cap, fastening (laced, buckled or strapped) |
| Boots | Fine Garments | 3 | thick sole, toe cap, fastening, cuff (turned or fur) |
| Tall boots | Fine Garments | 4 | thick sole, toe cap, fastening, cuff (turned or fur) |
| Belt | Weaving | 1 | pattern (studded or striped), buckle (square, round or plate), hanging end |
| Wide belt | Tailoring | 2 | pattern, buckle, hanging end |
| Waist sash | Classical Dress | 1 | stripes, fringed ends |
A gauntlet cuff and a plate buckle each take one more sheet. Padded backs, capped fingertips, laces, studs, hanging ends and fringes need Tailoring; buckled fastenings and round buckles need Classical Dress; toe caps, gauntlet cuffs and plate buckles need Fine Garments.
These designs change the look only. Tailored gloves, shoes and boots protect and keep you warm exactly like plain leather ones, and a tailored belt or sash is worn on the belt slot and carries pouches like a plain leather belt. They can be named, traced onto sewing patterns and kept in your pattern book like any other design.
Restyling bags, quivers and bandoliers
A tailor can restyle a finished leather backpack, leather satchel, duffel bag, rucksack, quiver, hide sling bag, bandolier or shoulder belt. Special versions of these, such as scale satchels, cannot be restyled.
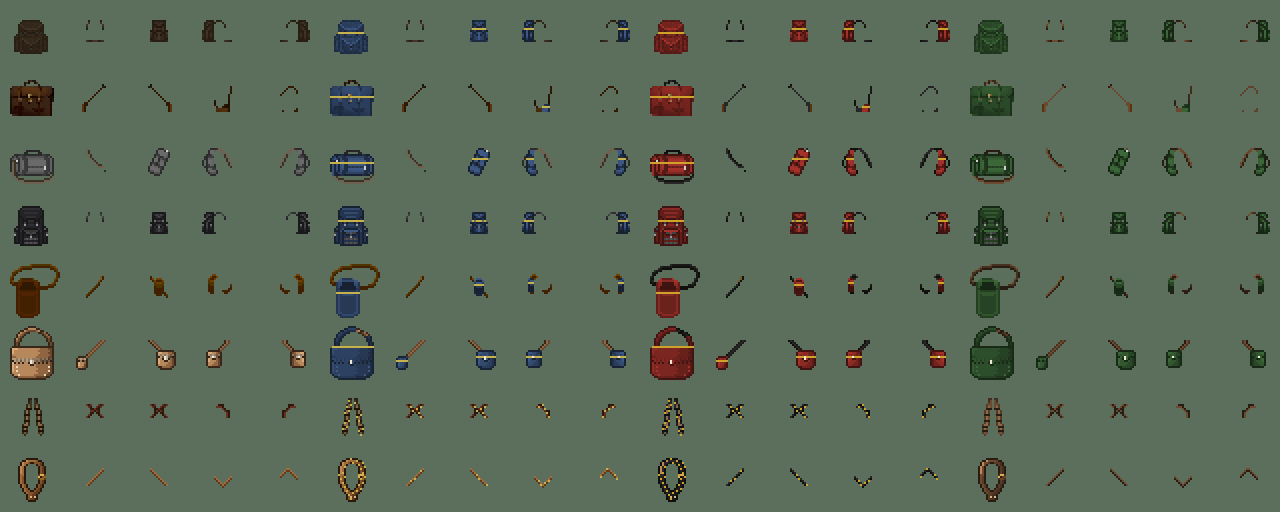
- Hold an uncut tailoring project in one hand and the bag in the other.
- Use the bag on the project.
- Pick a dye for the Fabric, a dye for the Straps and a Trim colour. A bandolier and a shoulder belt have straps and studs only. Choose As it was made to put a part back.
- Choose Sew the changes. After about 4 seconds the bag is restyled.
Each job takes one sheet from the project, of any material, and uses the dyes you know. A project with only one sheet is used up. Restyling changes the look only: the bag holds what it held before and is worn the same way, and buckles and toggles keep their own colour. Examining a restyled bag names its dyes.
Minor alterations
A tailor can also change a finished tailored garment, hat, pair of gloves, footwear or belt without sewing a new one. Hold an uncut tailoring project of the same material as the garment in one hand and the garment in the other, then use the garment on the project. The same preview appears while you choose.
- Colours re-dyes a part, and Pieces swaps a piece for another.
- One job changes at most two parts, takes one sheet from the project and about 4 seconds. Do another job to change more.
- An alteration is never a new garment. The garment, its name and its designer stay the same; a piece that needs extra fabric, such as long sleeves, legwear or a hood, cannot be added; and nothing that changes what the garment covers can be swapped.
- You need the knowledge for any new dye or piece you choose. Colours already on the garment can stay even if you could not make them yourself.
Clothing that was not tailored cannot be altered. Since the garment has to be in the tailor’s hands, its owner hands it over for the work.